In here we’ll go throughout all the necessary environment setup for macOS and install everything every full stack engineer is using to develop a end to end web application. Let’s take a look at below table for the relevant technologies and understand the techstack.
| Technology | Description |
| VScode | VScode is a popular code editor maintained by Microsoft with large open soruce community that continue to develop plugins and other integration tools and services. widely used by a lot of software engineers and is a great alternative to heavy IDE. |
| Chrome | Chrome is a powerful and fast web browser, We use it because of it’s robust web developer tool. |
| Iterm2 | Iterm2 is a wonderful easy to use terminal application, it allows you to run shell code, manage files, manage folders and projects, connect via SSH to a remote server and perform a lot of maintainability actions. Mostly used by Devops engineers and also by backend and front end engineers. |
| Oh My Zsh | Is a simple extension to Terminal, with plugins, shortcuts (and nice colors). |
| NVM | Since we write code in Nodejs we use NVM to manage different versions of Nodejs in our eco-system. Some projects need nodeJS version 18 and some needs version 22. It’s very important because if we’ll skip this step it will be very hard to install and uninstall nodejs in our eco system. |
| Nodejs 22 | We’ll use NVM to install Nodejs 22. |
| SSH Github | We’ll generate SSH keys in our location machine and then add a public key to github dashboard, This will help run run basic git command like “clone” a project from github, commit code and push code to github repository (manage history of our code development). |
| Docker | Docker is a tool that help use maintain, manage and run services like mongodb, nodejs, postgres, mysql, reddis and much more. It will ease your way into running a service that you need as an engineer. And most companies are using docker as part of their tech-stack to develop projects. |
| Mongo | Mongo is one out of many Databases out there, It’s the biggest noSQL database that use JSON(object) like data structure to save data and information. |
| MongoDB Compass GUI | We’ll use MongoDB Compass GUI because it’s easier and fast to visualize our database and see the data structure that we’ll insert to the database. |
Install VScode
Let’s go to VScode website and install version for macOS.
First thing you should do is to open VScode and set a shortcut that will help you open files from the terminal(our next app to be installed) command line:
Inside VS code press “CMD+SHIFT+P” than type “shell command install code”, This command will set a shortcut so inside your “terminal” you can write “code my_folder_name” and it will open the project in VScode.
Above Shell command will edit your “~/.zshrc” or “~/.bash_profile” files and will add shell code to those files that will be available in each terminal tab window.
Install Chrome
We Chrome browser because it has the most advance Developers tool for the browser (CMD+SHIFT+C inside chrome to see the developer tool).
Install Iterm2
I fancy Iterm2 for macOs, you can download Iterm2 here.
Install Oh My Zsh
I fancy Oh My Zsh for my Terminal, as it has bunch of plugins, looks decent, maintain by large open source community in github and easy to install and use(pick one method):
Install via CURL:
sh -c "$(curl -fsSL https://raw.githubusercontent.com/ohmyzsh/ohmyzsh/master/tools/install.sh)"
Install via wget:
sh -c "$(wget -O- https://raw.githubusercontent.com/ohmyzsh/ohmyzsh/master/tools/install.sh)"
Install via fetch:
sh -c "$(fetch -o - https://raw.githubusercontent.com/ohmyzsh/ohmyzsh/master/tools/install.sh)"
Now let’s open the “ZSHRC” file and sneak pick to see whats go inside:
cat ~/.zshrc
at the top of ZSHRC file we can use “source” and ad a bash profile that will be our customize shell commands that we want to add (we’ll add one just so you can get the idea behind it):
source ~/.bash_profile

# the rest of ZSHRC file gose here..
Since we don’t have bash_profile file, Let’s create one and add our first command:
touch ~/.bash_profile
Let’s add some content to this file:
alias work='cd /Users/<my_username>/work'
Above command is a shortcut, so every time we write “work” inside the terminal, It will automatically open the relevant work folder (of course we should have one, create one or change the PATH above to direct to an existing one)
IMPORTANT: whenever you change bash or rc file you’ll need to use the “source” command to reload the file! do so as such:
source ~/.bash_profile
That will trigger all the changes that you apply to the bash or rc file.
Install NVM
Let’s install NVM so we can use this tool to manage and install our nodejs versions from project to project, We use NVM because some projects use different versions of nodeJS and might require use to switch between those versions of nodeJS. Let’s install, Take a look and understand. Install with CURL:
curl -o- https://raw.githubusercontent.com/nvm-sh/nvm/v0.40.0/install.sh | bash
Install with wget:
wget -qO- https://raw.githubusercontent.com/nvm-sh/nvm/v0.40.0/install.sh | bash
After we install NVM, We’ll see it prompt use to add the Shell code to our “~/.zshrc” or “~/.bash_profile” files, this is what the shell code we need to add:
export NVM_DIR="$HOME/.nvm"
[ -s "$NVM_DIR/nvm.sh" ] && \. "$NVM_DIR/nvm.sh"  # This loads nvm
[ -s "$NVM_DIR/bash_completion" ] && \. "$NVM_DIR/bash_completion"  # This loads nvm bash_completion
The above code, Within “zshrc” will be trigger each time we open different terminal window or tab and will load the NVM manager. Let’s run some commands to understand NVM and how to use it to install different versions of nodeJS.
See version of NVM:
nvm --version
Install nodejs (currently 2024 stable version of nodejs is 22)
nvm install 22
However we might need older version of nodejs, so let’s install older one:
nvm install 18
Let’s see our installed nodejs versions with the following command line:
nvm list

If we write “node -v” we’ll see that we running now nodejs version 18.20.4
To use specific nodeJS version:
nvm use v22.5.1
Now we switch to node v22.5.1 and we also run node -v to see which node we are running.

SSH Connection to Github
Essentially what we do, We create 2 keys on our machine, on our own personal laptop. One key is private (only we have it on our machine) and another key is public (“<file_name.pub”). The public key is used by the destination we want to connect to(in this case, github servers), and we’ll provide github with the public key.
Let’s start by checking if you already have SSH keys:
$ ls -al ~/.ssh
Generate SSH key
At this point you can either generate a new SSH key or use existing one, i’d recommend creating a new one for github:
ssh-keygen -t ed25519 -C "your_email@example.com"
You’ll be prompt to add passphrase, you can add one (a simple password) or leave it empty).
You should start the SSH agent in the background:
eval "$(ssh-agent -s)"
Let’s modify our config file:
open ~/.ssh/config
If it doesn’t exists, let’s create one with the “touch” command:
touch ~/.ssh/config
Add the following code to the config to declare github as one of your hosts (and it’s path to the private SSH key), if you don’t use passphrase, than remove the “UseKeychain” line:
Host github.com
  AddKeysToAgent yes
  UseKeychain yes
  IdentityFile ~/.ssh/id_ed25519
Add your SSH private key to your agent:
ssh-add --apple-use-keychain ~/.ssh/id_ed25519
Now if you use your terminal to output your SSH folder you should see relevant files as such:
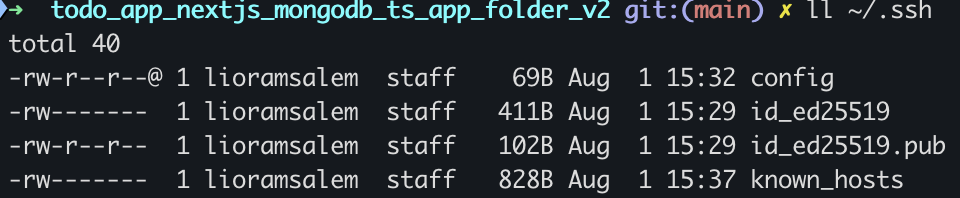
Copy Public SSH Key
Use the following command to copy the public key:
pbcopy < ~/.ssh/id_ed25519.pub
If it doesn’t work, you can use the “cat” command and copy as usual with your keyboard/mouse.
Add SSH Public Key To Github
Go to github.com -> click on your profile -> click “settings” -> Click “SSH GPG keys” -> click “New SSH Key” and add a title and your public here than click “Add SSH Key”.
Summary
Now you should be able to git clone projects with SSH (when you git clone, pick SSH) and also clone private projects that are hidden from the public and are listed on your personal github account! Time to work!
Install Docker
Go to this link and install docker, make sure to pick Apple silicon chip or intel chip (in your mac click the Apple logo at the top -> “About” and you’ll see what chip you have). In the next step we’ll use Docker repository to install mongoDB.
Important: you want to allow docker to run in the background, macOS will prompt you with the question if you would like to do so or not!
Install Mongo
MongoDB is a popular noSQL large scale database that uses JSON like data structure and objects to manage and maintain applications data. It is popular and is used by Uber, Lyft, Airbnb, Fiverr, Wizz, Walkme, Deel and many other companies and startups.
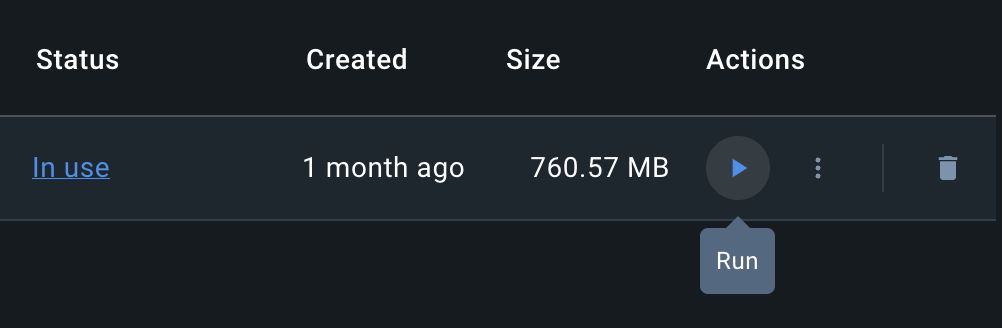
After we install Docker in previous step, We’ll search for “mongo” in the search bar above:

Let’s install mongo image (it should have 1B installation, you can’t miss it!) and afterwards we’ll go to the “images” tab on the left inside docker UI and run the image of mongo:
Afterwards we’ll be prompt with a window and we should click “Optional settings”:
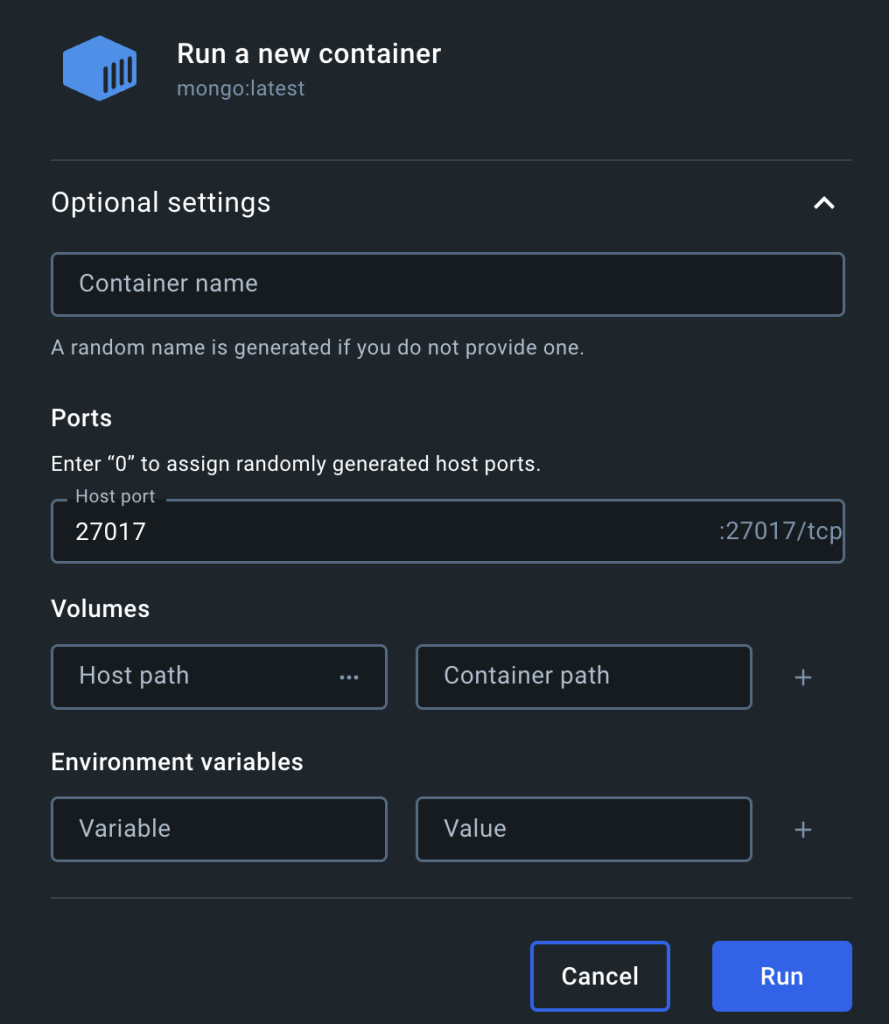
Inside optional settings it’s very important to add the (external) port “27017” under “Host port” otherwise you won’t be able to connect to the container. Once we do so and click “run” we’ll have a container running automatically in the background of mongodb.
In the next step w’ell use MongoDB compass to connect our database, and do basic actions like creating collections, databases and edit items.
Install MongoDB compass
MongoDB run in the background, and technically we can use the terminal to access everything in the Mongo instance that is runnig with our docker. However it’s easier to visually see our database and collections so we’ll use MongoDB compass UI to see our database collections.
Let’s download MongoDB compass GUI, After installation of the application, We’ll see a window that suggestion us to connect to the database, Just click “connect”:
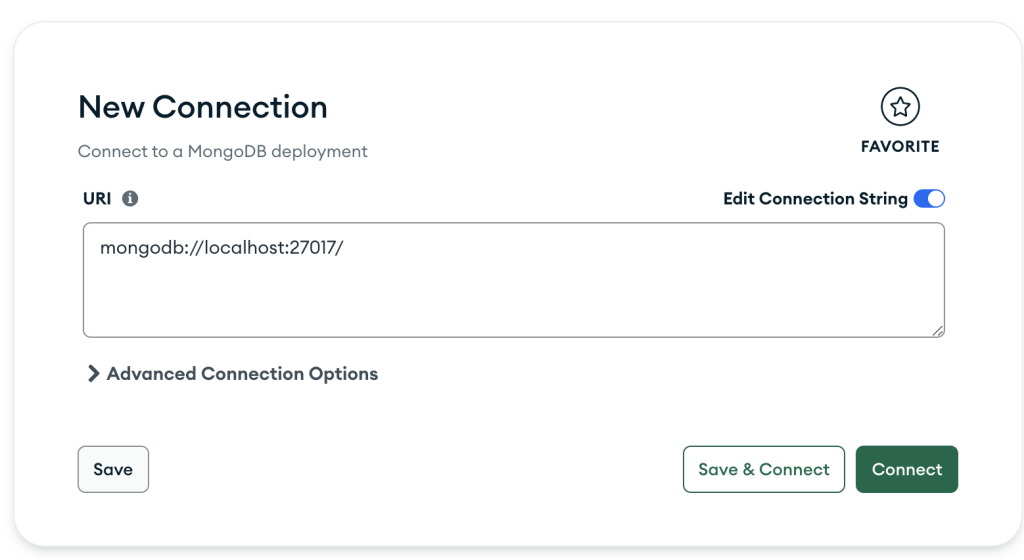
If you didn’t set the port to be 27017 you’ll have troubles at this step, So go to the previous step of docker running the Mongo container and try it again.
Summary
Congrats, now you have fully working environment of a software engineer, full stack with everything you need in order to develop run and work on whatever projects you want. You should continue improve your productivity and tools and other software languages you’ll need in the future and add more commands and plugins to different softwares like VScode. Congrats and keep going! note that we’ll update this article from time to time so maybe it’s a good idea to come back in the future and revisit this process

Lior Amsalem embarked on his software engineering journey in the early 2000s, Diving into Pascal with a keen interest in creating, developing, and working on new technologies. Transitioning from his early teenage years as a freelancer, Lior dedicated countless hours to expanding his knowledge within the software engineering domain. He immersed himself in learning new development languages and technologies such as JavaScript, React, backend, frontend, devops, nextjs, nodejs, mongodb, mysql and all together end to end development, while also gaining insights into business development and idea implementation.
Through his blog, Lior aims to share his interests and entrepreneurial journey, driven by a desire for independence and freedom from traditional 9-5 work constraints.
Leave a Reply